
How to Sew Traditional Bookbinding Headbands (Endbands) by Hand
Headbands (also called endbands) are decorative and functional bands sewn onto the head and tail of a book spine. Traditionally hand-sewn around a core material, they help protect the spine, reinforce the text block, and provide a finished, decorative appearance.
One of the most widely used styles today is the simple two-color headband. Created with two threads and a small core, this technique produces a repeating pattern of alternating windings and small “beads” that sit neatly along the edge of a prepared text block.
Materials
To create a simple two-color headband, you will need:
Two colors of headband silk thread
A needle large enough to accommodate your thread
A braided cord or leather core approximately 3 mm (1/8 inch) in diameter
A prepared text block or pre-made book block, ready for casing-in
Preparing the Threads
Begin by cutting two threads of different colors approximately one yard long. Tie the threads together at one end with an overhand knot.
One thread will act as the tying-down thread, while the other will serve as the winding thread. Thread the tying-down thread through the needle.
Open the first signature to its center and insert the needle from the inside through the top kettle stitch hole. Pull the thread through so the knot sits snugly inside the spine.

Bring the thread over the top of the signature, back into the center, and out through the same kettle stitch hole. This creates a small loop that will secure the headband core.
For additional stability while working, the text block can be placed into a press at an angle or secured between boards to help maintain consistent tension.
Establishing the Core
Place the core across the top of the book and slip one end into the loop. Gently tighten the loop around the core, securing it without pulling it out of alignment.

The first windings establish the foundation of the headband. Pass the winding thread under the core on one side, around the back of the loop, and under the core on the opposite side. This helps secure the tying-down thread before beginning the alternating color pattern.


Bring the tying-down thread up from the back and lay it neatly over the core. Create two windings of this color before introducing the second thread.

Creating the Two-Color Pattern
To begin the second color, bring the winding thread under the core and over the tying-down thread, pushing the tying-down thread back beneath the core. Pull gently to create the small bead that sits beneath the windings.
Continue by bringing the thread back over the core to form the first winding in the new color. Wrap the thread around the core again to create a second winding, keeping the pair aligned with the previous color.

Repeat this sequence across the spine: two windings in one color, followed by a bead and two windings in the alternating color.
As you work, maintain even tension throughout each winding and keep the beads aligned along the edge of the text block. Small adjustments with your fingers or fingernail can help keep each pair of threads sitting neatly against the previous section.
On alternating tying-down sections, bring the tying-down thread over the core, pass it down into the center of the nearest signature, and return it through the kettle stitch hole. Pull firmly to seat the winding beside the previous section, then bring the thread back over the core to complete the second winding.
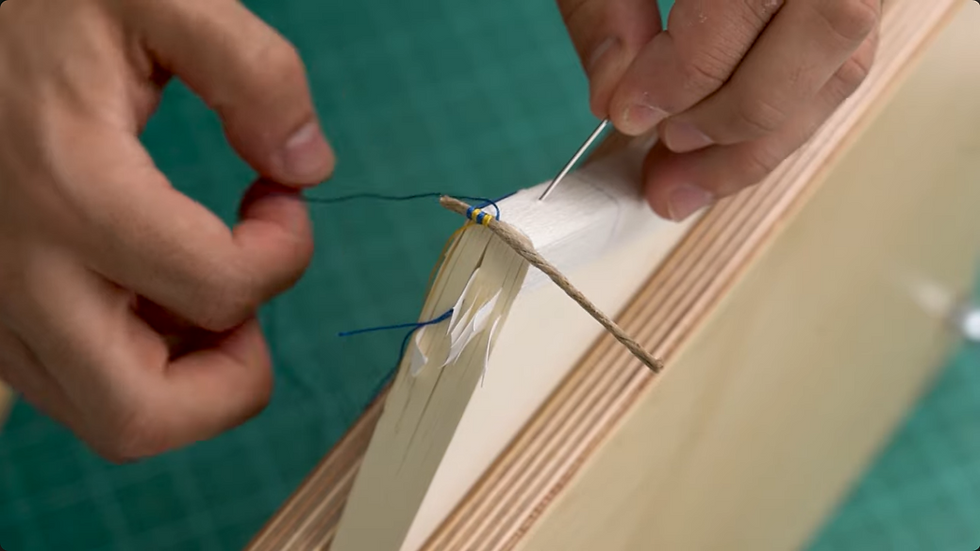
Continue working steadily until you reach the end of the text block.
Finishing the Headband
At the end of the book, finish with the tying-down thread by creating one final winding. Pass the needle into the final signature and out through the kettle stitch hole.

Bring the remaining thread beneath the core to create one final bead, then lay both threads along the spine. Apply a small amount of PVA adhesive and use a brush to gently secure the threads against the spine. Allow the adhesive to dry before trimming any excess thread.

Next, carefully cut the excess core flush with the beginning and end of the headband, taking care not to cut through the wrapped threads.
Apply a small amount of PVA to the exposed ends of the core to prevent fraying, and add adhesive behind several windings for additional security.

Once complete, repeat the same process on the opposite end of the spine, keeping the wrapping pattern and tension consistent.

A simple two-color headband adds both structure and character to a binding—a small finishing detail that reflects the care and craftsmanship behind the book.


